Python Pyramid - Logging 日志消息
为了收集有关应用程序的有用信息,Pyramid 使用了 Python 标准库中的 logging 模块。 事实证明,它在开发和生产模式中很有用,可以在应用程序运行期间检测问题(如果有)。 应用程序日志可以包含您自己的消息以及来自第三方模块的消息。
记录的消息具有以下预定义类型(按严重性递减的顺序) −
- CRITICAL
- ERROR
- WARNING
- INFO
- DEBUG
- NOTSET
默认情况下,日志消息被重定向到 sys.stderr 流。 要开始收集日志消息,我们需要声明一个 Logger 对象。
import logging
log = logging.getLogger(__name__)
现在可以使用与所需日志级别对应的日志方法生成日志消息。 要生成对调试应用程序有用的消息,请使用带有适当消息字符串的 log.debug() 消息。
基于 PasteDeploy 配置的 Pyramid 应用程序使得启用合并日志记录支持变得非常容易。 PasteDEploy 文件(development.ini 和 production.ini)使用日志模块配置参数中使用的 ConfigParser 格式。 development.ini 中与日志记录相关的部分在被 pserve 命令调用时被传递到日志模块的配置过程。
配置文件中的各种记录器部分指定应用程序对象的键、格式和记录器级别。
在典型的"development.ini"文件中声明了以下与日志记录相关的部分 −
# Begin logging configuration
[loggers]
keys = root, hello
[logger_hello]
level = DEBUG
handlers =
qualname = hello
[handlers]
keys = console
[formatters]
keys = generic
[logger_root]

#level = INFO
level=DEBUG
handlers = console
[handler_console]
class = StreamHandler
args = (sys.stderr,)
level = NOTSET
formatter = generic
[formatter_generic]
format = %(asctime)s %(levelname)-5.5s [%(name)s][%(threadName)s] %(message)s

# End logging configuration
让我们将这些部分添加到上一章的 Hello 应用程序的 development.ini 文件中。
示例
接下来,声明 Logger 对象并将调试消息放入 hello_world() 几个函数中。 这是 __init__.py 代码 −
from pyramid.config import Configurator
from pyramid.response import Response
from pyramid.view import view_config
import logging
log = logging.getLogger(__name__)
from pyramid.renderers import render_to_response
def hello_world(request):
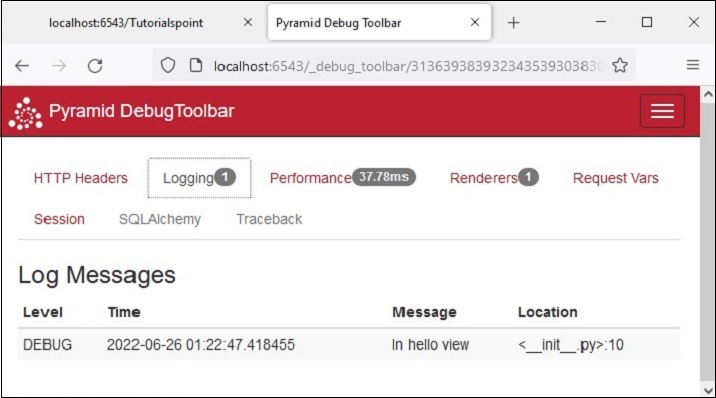
log.debug('In hello view')
return render_to_response('templates/hello.html',
{'name':request.matchdict['name']},request=request)
def main(global_config, **settings):
config = Configurator(settings=settings)
config.include('pyramid_jinja2')
config.add_jinja2_renderer(".html")
config.add_route('hello', '/{name}')
config.add_view(hello_world, route_name='hello')
return config.make_wsgi_app()
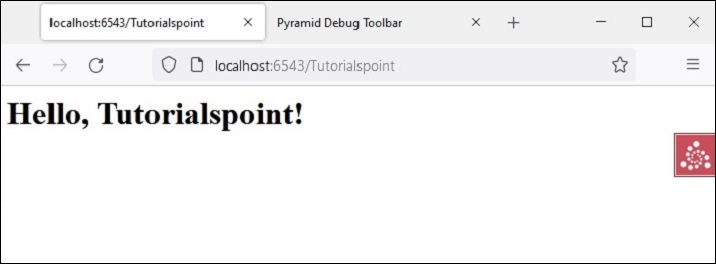
hello_world() 视图呈现以下 hello.html 模板 −
<html>
   <body>
      <h1>Hello, {{ name }}!</h1>
   </body>
</html>
像往常一样运行应用程序 −
pserve development.ini
当在浏览器中输入 http://localhost:6543/Tutorialpoint URL 时,命令窗口会回显以下调试信息 −
Starting monitor for PID 11176.
Starting server in PID 8472.
2022-06-26 01:22:47,032 INFO [waitress][MainThread] Serving on http://[::1]:6543
2022-06-26 01:22:47,032 INFO [waitress][MainThread] Serving on http://127.0.0.1:6543
2022-06-26 01:22:47,418 DEBUG [hello][waitress-1] In hello view
输出
由于配置中启用了调试工具栏,因此在浏览器中显示 −
调试消息也显示在调试工具栏的日志选项卡上,如下所示 −