Spring Boot - 使用 JWT 的 OAuth2
在本章中,您将详细了解 Spring Boot 安全机制和带有 JWT 的 OAuth2。
授权服务器
授权服务器是 Web API 安全性的最高架构组件。 授权服务器充当集中授权点,允许您的应用程序和 HTTP 端点识别您的应用程序的功能。
资源服务器
资源服务器是一个应用程序,它向客户端提供访问令牌以访问资源服务器 HTTP 端点。 它是包含 HTTP 端点、静态资源和动态网页的库的集合。
OAuth2
OAuth2 是一个授权框架,使应用程序网络安全能够访问来自客户端的资源。 要构建 OAuth2 应用程序,我们需要关注授权类型(授权码)、客户端 ID 和客户端密码。
JWT Token
JWT Token 是一个 JSON Web Token,用于表示两方之间的安全声明。 您可以在 www.jwt.io/ 了解有关 JWT 令牌的更多信息。
现在,我们将构建一个 OAuth2 应用程序,它可以在 JWT 令牌的帮助下使用授权服务器、资源服务器。
您可以使用以下步骤通过访问数据库来使用 JWT 令牌实现 Spring Boot Security。
首先,我们需要在构建配置文件中添加以下依赖项。
Maven 用户可以在您的 pom.xml 文件中添加以下依赖项。
<dependency>
   <groupId>org.springframework.boot</groupId>
   <artifactId>spring-boot-starter-jdbc</artifactId>
</dependency>

<dependency>
   <groupId>org.springframework.boot</groupId>
   <artifactId>spring-boot-starter-security</artifactId>
</dependency>

<dependency>
   <groupId>org.springframework.boot</groupId>
   <artifactId>spring-boot-starter-web</artifactId>
</dependency>

<dependency>
   <groupId>org.springframework.security.oauth</groupId>
   <artifactId>spring-security-oauth2</artifactId>
</dependency>

<dependency>
   <groupId>org.springframework.security</groupId>
   <artifactId>spring-security-jwt</artifactId>
</dependency>

<dependency>
   <groupId>com.h2database</groupId>
   <artifactId>h2</artifactId>
</dependency>

<dependency>
   <groupId>org.springframework.boot</groupId>
   <artifactId>spring-boot-starter-test</artifactId>
   <scope>test</scope>
</dependency>

<dependency>
   <groupId>org.springframework.security</groupId>
   <artifactId>spring-security-test</artifactId>
   <scope>test</scope>
</dependency>
Gradle 用户可以在 build.gradle 文件中添加以下依赖项。
compile('org.springframework.boot:spring-boot-starter-security')
compile('org.springframework.boot:spring-boot-starter-web')
testCompile('org.springframework.boot:spring-boot-starter-test')
testCompile('org.springframework.security:spring-security-test')

compile("org.springframework.security.oauth:spring-security-oauth2")
compile('org.springframework.security:spring-security-jwt')
compile("org.springframework.boot:spring-boot-starter-jdbc")
compile("com.h2database:h2:1.4.191")
这里,
Spring Boot Starter Security − 实现 Spring Security
Spring Security OAuth2 − 实现 OAUTH2 结构以启用授权服务器和资源服务器。
Spring Security JWT − 为 Web 安全生成 JWT 令牌
Spring Boot Starter JDBC − 访问数据库以确保用户可用或不可用。
Spring Boot Starter Web − 写入 HTTP 端点。
H2 Database − 存储用户信息以进行认证和授权。
完整的构建配置文件如下所示。
<?xml version = "1.0" encoding = "UTF-8"?>
<project xmlns = "http://maven.apache.org/POM/4.0.0"
   xmlns:xsi = "http://www.w3.org/2001/XMLSchema-instance"
   xsi:schemaLocation = "http://maven.apache.org/POM/4.0.0
   http://maven.apache.org/xsd/maven-4.0.0.xsd">

   <modelVersion>4.0.0</modelVersion>
   <groupId>com.tutorialspoint</groupId>
   <artifactId>websecurityapp</artifactId>
   <version>0.0.1-SNAPSHOT</version>
   <packaging>jar</packaging>
   <name>websecurityapp</name>
   <description>Demo project for Spring Boot</description>

   <parent>
      <groupId>org.springframework.boot</groupId>
      <artifactId>spring-boot-starter-parent</artifactId>
      <version>1.5.9.RELEASE</version>
      <relativePath /> <!-- lookup parent from repository -->
   </parent>

   <properties>
      <project.build.sourceEncoding>UTF-8</project.build.sourceEncoding>
      <project.reporting.outputEncoding>UTF-8</project.reporting.outputEncoding>
      <java.version>1.8</java.version>
   </properties>

   <dependencies>
      <dependency>
         <groupId>org.springframework.boot</groupId>
         <artifactId>spring-boot-starter-jdbc</artifactId>
      </dependency>

      <dependency>
         <groupId>org.springframework.boot</groupId>
         <artifactId>spring-boot-starter-security</artifactId>
      </dependency>

      <dependency>
         <groupId>org.springframework.boot</groupId>
         <artifactId>spring-boot-starter-web</artifactId>
      </dependency>

      <dependency>
         <groupId>org.springframework.security.oauth</groupId>
         <artifactId>spring-security-oauth2</artifactId>
      </dependency>

      <dependency>
         <groupId>org.springframework.security</groupId>
         <artifactId>spring-security-jwt</artifactId>
      </dependency>

      <dependency>
         <groupId>com.h2database</groupId>
         <artifactId>h2</artifactId>
      </dependency>

      <dependency>
         <groupId>org.springframework.boot</groupId>
         <artifactId>spring-boot-starter-test</artifactId>
         <scope>test</scope>
      </dependency>

      <dependency>
         <groupId>org.springframework.security</groupId>
         <artifactId>spring-security-test</artifactId>
         <scope>test</scope>
      </dependency>
   </dependencies>

   <build>
      <plugins>
         <plugin>
            <groupId>org.springframework.boot</groupId>
            <artifactId>spring-boot-maven-plugin</artifactId>
         </plugin>
      </plugins>
   </build>

</project>
Gradle – build.gradle
buildscript {
   ext {
      springBootVersion = '1.5.9.RELEASE'
   }
   repositories {
      mavenCentral()
   }
   dependencies {
      classpath("org.springframework.boot:spring-boot-gradle-plugin:${springBootVersion}")
   }
}
apply plugin: 'java'
apply plugin: 'eclipse'
apply plugin: 'org.springframework.boot'

group = 'com.tutorialspoint'
version = '0.0.1-SNAPSHOT'
sourceCompatibility = 1.8

repositories {
   mavenCentral()
}

dependencies {
   compile('org.springframework.boot:spring-boot-starter-security')
   compile('org.springframework.boot:spring-boot-starter-web')
   testCompile('org.springframework.boot:spring-boot-starter-test')
   testCompile('org.springframework.security:spring-security-test')
   compile("org.springframework.security.oauth:spring-security-oauth2")
   compile('org.springframework.security:spring-security-jwt')
   compile("org.springframework.boot:spring-boot-starter-jdbc")
   compile("com.h2database:h2:1.4.191")
}
现在,在主 Spring Boot 应用程序中,添加 @EnableAuthorizationServer 和 @EnableResourceServer 注解以充当同一应用程序中的身份验证服务器和资源服务器。
此外,您可以使用以下代码编写一个简单的 HTTP 端点,以使用 JWT Token 使用 Spring Security 访问 API。
package com.tutorialspoint.websecurityapp;
import org.springframework.boot.SpringApplication;
import org.springframework.boot.autoconfigure.SpringBootApplication;
import org.springframework.security.oauth2.config.annotation.web.configuration.EnableAuthorizationServer;
import org.springframework.security.oauth2.config.annotation.web.configuration.EnableResourceServer;
import org.springframework.web.bind.annotation.RequestMapping;
import org.springframework.web.bind.annotation.RestController;
@SpringBootApplication
@EnableAuthorizationServer
@EnableResourceServer
@RestController
public class WebsecurityappApplication {
public static void main(String[] args) {
SpringApplication.run(WebsecurityappApplication.class, args);
}
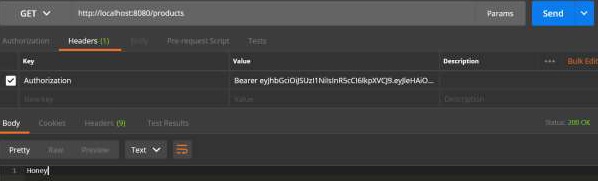
@RequestMapping(value = "/products")
public String getProductName() {
return "Honey";
}
}
使用以下代码定义 POJO 类来存储用户信息以进行身份验证。
package com.tutorialspoint.websecurityapp;

import java.util.ArrayList;
import java.util.Collection;
import org.springframework.security.core.GrantedAuthority;

public class UserEntity {
   private String username;
   private String password;
   private Collection<GrantedAuthority> grantedAuthoritiesList = new ArrayList<>();

   public String getPassword() {
      return password;
   }
   public void setPassword(String password) {
      this.password = password;
   }
   public Collection<GrantedAuthority> getGrantedAuthoritiesList() {
      return grantedAuthoritiesList;
   }
   public void setGrantedAuthoritiesList(Collection<GrantedAuthority> grantedAuthoritiesList) {
      this.grantedAuthoritiesList = grantedAuthoritiesList;
   }
   public String getUsername() {
      return username;
   }
   public void setUsername(String username) {
      this.username = username;
   }
}
现在,使用以下代码并定义扩展 org.springframework.security.core.userdetails.User 类的 CustomUser 类以进行 Spring Boot 身份验证。
package com.tutorialspoint.websecurityapp;

import org.springframework.security.core.userdetails.User;

public class CustomUser extends User {
   private static final long serialVersionUID = 1L;
   public CustomUser(UserEntity user) {
      super(user.getUsername(), user.getPassword(), user.getGrantedAuthoritiesList());
   }
}
您可以创建 @Repository 类以从数据库中读取用户信息并将其发送到自定义用户服务,并添加授予的权限"ROLE_SYSTEMADMIN"。
package com.tutorialspoint.websecurityapp;

import java.sql.ResultSet;
import java.util.ArrayList;
import java.util.Collection;
import java.util.List;

import org.springframework.beans.factory.annotation.Autowired;
import org.springframework.jdbc.core.JdbcTemplate;
import org.springframework.security.core.GrantedAuthority;
import org.springframework.security.core.authority.SimpleGrantedAuthority;
import org.springframework.stereotype.Repository;

@Repository
public class OAuthDao {
   @Autowired
   private JdbcTemplate jdbcTemplate;

   public UserEntity getUserDetails(String username) {
      Collection<GrantedAuthority> grantedAuthoritiesList = new ArrayList<>();
      String userSQLQuery = "SELECT * FROM USERS WHERE USERNAME=?";
      List<UserEntity> list = jdbcTemplate.query(userSQLQuery, new String[] { username },
         (ResultSet rs, int rowNum) -> {

         UserEntity user = new UserEntity();
         user.setUsername(username);
         user.setPassword(rs.getString("PASSWORD"));
         return user;
      });
      if (list.size() > 0) {
         GrantedAuthority grantedAuthority = new SimpleGrantedAuthority("ROLE_SYSTEMADMIN");
         grantedAuthoritiesList.add(grantedAuthority);
         list.get(0).setGrantedAuthoritiesList(grantedAuthoritiesList);
         return list.get(0);
      }
      return null;
   }
}
您可以创建一个扩展 org.springframework.security.core.userdetails.UserDetailsService 的自定义用户详细信息服务类,以调用 DAO 存储库类,如图所示。
package com.tutorialspoint.websecurityapp;

import org.springframework.beans.factory.annotation.Autowired;
import org.springframework.security.core.userdetails.UserDetailsService;
import org.springframework.security.core.userdetails.UsernameNotFoundException;
import org.springframework.stereotype.Service;

@Service
public class CustomDetailsService implements UserDetailsService {
   @Autowired
   OAuthDao oauthDao;

   @Override
   public CustomUser loadUserByUsername(final String username) throws UsernameNotFoundException {
      UserEntity userEntity = null;
      try {
         userEntity = oauthDao.getUserDetails(username);
         CustomUser customUser = new CustomUser(userEntity);
         return customUser;
      } catch (Exception e) {
         e.printStackTrace();
         throw new UsernameNotFoundException("User " + username + " was not found in the database");
      }
   }
}
接下来,创建一个@configuration 类以启用 Web 安全,定义密码编码器 (BCryptPasswordEncoder),并定义 AuthenticationManager bean。 Security 配置类应该扩展 WebSecurityConfigurerAdapter 类。
package com.tutorialspoint.websecurityapp;

import org.springframework.beans.factory.annotation.Autowired;
import org.springframework.context.annotation.Bean;
import org.springframework.context.annotation.Configuration;

import org.springframework.security.authentication.AuthenticationManager;
import org.springframework.security.config.annotation.authentication.builders.AuthenticationManagerBuilder;
import org.springframework.security.config.annotation.method.configuration.EnableGlobalMethodSecurity;
import org.springframework.security.config.annotation.web.builders.HttpSecurity;
import org.springframework.security.config.annotation.web.builders.WebSecurity;
import org.springframework.security.config.annotation.web.configuration.EnableWebSecurity;
import org.springframework.security.config.annotation.web.configuration.WebSecurityConfigurerAdapter;
import org.springframework.security.config.http.SessionCreationPolicy;
import org.springframework.security.crypto.bcrypt.BCryptPasswordEncoder;
import org.springframework.security.crypto.password.PasswordEncoder;

@Configuration
@EnableWebSecurity
@EnableGlobalMethodSecurity(prePostEnabled = true)
public class SecurityConfiguration extends WebSecurityConfigurerAdapter {
   @Autowired
   private CustomDetailsService customDetailsService;

   @Bean
   public PasswordEncoder encoder() {
      return new BCryptPasswordEncoder();
   }
   @Override
   @Autowired
   protected void configure(AuthenticationManagerBuilder auth) throws Exception {
      auth.userDetailsService(customDetailsService).passwordEncoder(encoder());
   }
   @Override
   protected void configure(HttpSecurity http) throws Exception {
      http.authorizeRequests().anyRequest().authenticated().and().sessionManagement()
         .sessionCreationPolicy(SessionCreationPolicy.NEVER);
   }
   @Override
   public void configure(WebSecurity web) throws Exception {
      web.ignoring();
   }
   @Override
   @Bean
   public AuthenticationManager authenticationManagerBean() throws Exception {
      return super.authenticationManagerBean();
   }
}
现在,定义 OAuth2 配置类以添加 Client ID、Client Secret,为令牌签名者密钥和验证者密钥定义 JwtAccessTokenConverter、私钥和公钥,并为带有范围的令牌有效性配置 ClientDetailsServiceConfigurer。
package com.tutorialspoint.websecurityapp;

import org.springframework.beans.factory.annotation.Autowired;
import org.springframework.beans.factory.annotation.Qualifier;
import org.springframework.context.annotation.Bean;
import org.springframework.context.annotation.Configuration;

import org.springframework.security.authentication.AuthenticationManager;
import org.springframework.security.oauth2.config.annotation.configurers.ClientDetailsServiceConfigurer;
import org.springframework.security.oauth2.config.annotation.web.configuration.AuthorizationServerConfigurerAdapter;
import org.springframework.security.oauth2.config.annotation.web.configurers.AuthorizationServerEndpointsConfigurer;
import org.springframework.security.oauth2.config.annotation.web.configurers.AuthorizationServerSecurityConfigurer;
import org.springframework.security.oauth2.provider.token.store.JwtAccessTokenConverter;
import org.springframework.security.oauth2.provider.token.store.JwtTokenStore;

@Configuration
public class OAuth2Config extends AuthorizationServerConfigurerAdapter {
   private String clientid = "tutorialspoint";
   private String clientSecret = "my-secret-key";
   private String privateKey = "private key";
   private String publicKey = "public key";

   @Autowired
   @Qualifier("authenticationManagerBean")
   private AuthenticationManager authenticationManager;

   @Bean
   public JwtAccessTokenConverter tokenEnhancer() {
      JwtAccessTokenConverter converter = new JwtAccessTokenConverter();
      converter.setSigningKey(privateKey);
      converter.setVerifierKey(publicKey);
      return converter;
   }
   @Bean
   public JwtTokenStore tokenStore() {
      return new JwtTokenStore(tokenEnhancer());
   }
   @Override
   public void configure(AuthorizationServerEndpointsConfigurer endpoints) throws Exception {
      endpoints.authenticationManager(authenticationManager).tokenStore(tokenStore())
      .accessTokenConverter(tokenEnhancer());
   }
   @Override
   public void configure(AuthorizationServerSecurityConfigurer security) throws Exception {
      security.tokenKeyAccess("permitAll()").checkTokenAccess("isAuthenticated()");
   }
   @Override
   public void configure(ClientDetailsServiceConfigurer clients) throws Exception {
      clients.inMemory().withClient(clientid).secret(clientSecret).scopes("read", "write")
         .authorizedGrantTypes("password", "refresh_token").accessTokenValiditySeconds(20000)
         .refreshTokenValiditySeconds(20000);

   }
}
现在,使用 openssl 创建私钥和公钥。
您可以使用以下命令生成私钥。
openssl genrsa -out jwt.pem 2048
openssl rsa -in jwt.pem
您可以使用以下命令生成公钥。
openssl rsa -in jwt.pem -pubout
对于 1.5 之后的 Spring Boot 版本,在 application.properties 文件中添加以下属性以定义 OAuth2 资源过滤器顺序。
security.oauth2.resource.filter-order=3
YAML 文件用户可以在 YAML 文件中添加以下属性。
security:
   oauth2:
      resource:
         filter-order: 3
现在,在类路径资源 src/main/resources/directory 下创建 schema.sql 和 data.sql 文件,将应用程序连接到 H2 数据库。
schema.sql文件如图 −
CREATE TABLE USERS (ID INT PRIMARY KEY, USERNAME VARCHAR(45), PASSWORD VARCHAR(60));
data.sql文件如图 −
INSERT INTO USERS (ID, USERNAME,PASSWORD) VALUES (
   1, 'tutorialspoint@gmail.com','$2a$08$fL7u5xcvsZl78su29x1ti.dxI.9rYO8t0q5wk2ROJ.1cdR53bmaVG');

INSERT INTO USERS (ID, USERNAME,PASSWORD) VALUES (
   2, 'myemail@gmail.com','$2a$08$fL7u5xcvsZl78su29x1ti.dxI.9rYO8t0q5wk2ROJ.1cdR53bmaVG');
注意 − 密码应以 Bcrypt Encoder 的格式存储在数据库表中。
您可以创建可执行 JAR 文件,并使用以下 Maven 或 Gradle 命令运行 Spring Boot 应用程序。
对于 Maven,您可以使用下面给出的命令 −
mvn clean install
在“BUILD SUCCESS”之后,您可以在目标目录下找到 JAR 文件。
对于 Gradle,可以使用如图所示的命令 −
gradle clean build
在“BUILD SUCCESSFUL”之后,您可以在 build/libs 目录下找到 JAR 文件。
现在,使用此处显示的命令运行 JAR 文件 −
java –jar <JARFILE>
应用程序在 Tomcat 端口 8080 上启动。

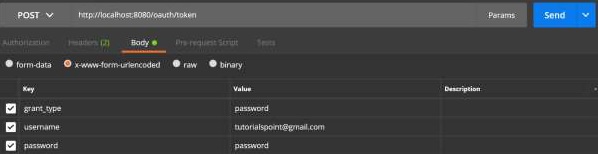
现在通过 POSTMAN 访问 POST 方法 URL 以获取 OAUTH2 令牌。
http://localhost:8080/oauth/token
现在,添加请求标头如下 −
Authorization − 使用您的客户端 ID 和客户端密码进行基本身份验证。
Content Type − application/x-www-form-urlencoded

现在,添加请求参数如下 −
- grant_type = password
- username = your username
- password = your password
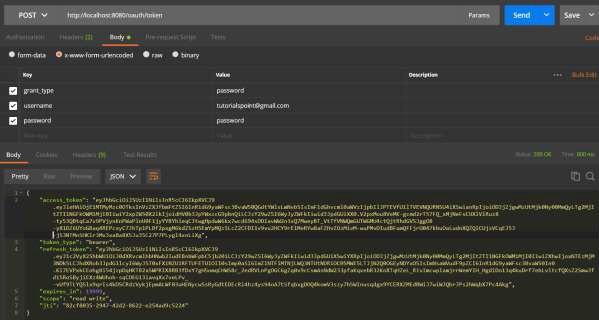
现在,点击 API 并获取 access_token,如图所示 −
现在,使用请求标头中的承载访问令牌点击资源服务器 API,如图所示。
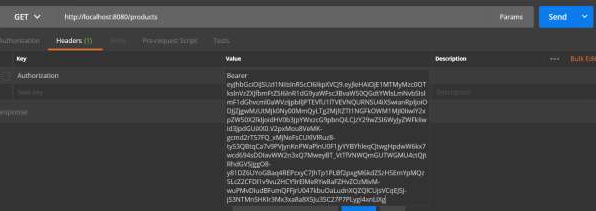
然后就可以看到输出如下图 −